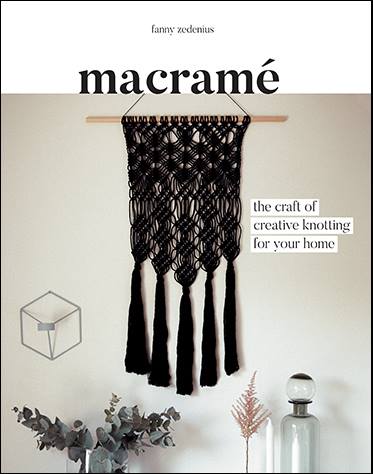
Macrame
Craft Corner - Make this beautiful wall hanging from Macrame by Fanny Zedenius
8 Jan 2018 |
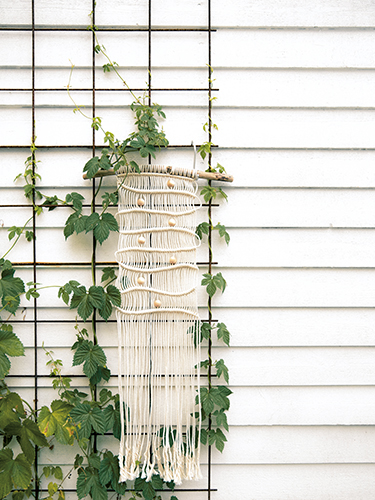
Wilma Wall Hanging
This little wall hanging is 22cm (8 3/4 in) wide and 75cm (29 ½ in) long. The pattern is very easy to make and to mould according to your own preferences. You can add more cords to make it wider, or add more beads – this is a style to play around with!
Knots used
Reverse lark’s head knot (RLHK - see below)
Horizontal clove hitch (HCH - see below)
Materials
56m (60 1/2 yd) of twined 2.5mm ( 1/8 in) cotton rope 40cm (153/4 in) wooden stick or dowel
7 wooden beads, 2cm ( 3/4 in) diameter
Preparation
Cut the following:
18 cords, each 2.8m (31/8 yd) long
1 cord, 3.9m (4 1/4 yd) long (extra-long to use as filler cord for the horizontal clove hitches)
Fold each of the 18 cords in half and attach to the dowel using a reverse lark’s head knot (RLHK). Fold the extra-long cord with 140cm (55 in) on the left side and 250cm (98 in) on the right, and attach it to the right of the other cords using a reverse head knot.

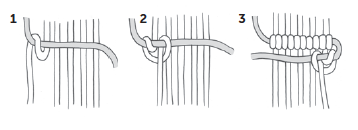
Master Your Knots
Reverse lark’s head knot RLHK
The reverse lark’s head knot, most commonly used to attach cords to a dowel or an anchor cord, is worked in the same way as the standard version, but from the reverse so the bump is hidden.
Step 1
Fold the cord in half and then fold the loop towards you over the dowel or anchor cord.
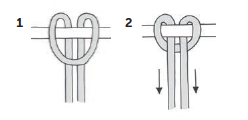
Step 2
Pass the 2 cord ends through the loop at the back and pull the cords to tighten the knot.
TIP This version can also be tied in the alternative way if one end is already attached somewhere.
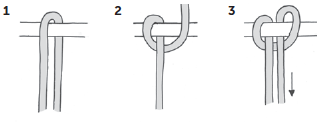
Horizontal Clove Hitch HCH
The horizontal clove hitch forms a straight line across a panel, with the filler cord running through it going either left-to-right or right-to-left, or bending back and forth.
Step 1
To make a line going left-to-right, use the furthest left cord as filler cord, holding it horizontally in front of all the other cords on the panel. Use the next cord to the right as the working cord for the first clove hitch, first bringing it forward, up and around the filler cord towards the left. Pull the working cord to tighten the loop while tilting the filler cord slightly upwards.
Step 2
Finish the first clove hitch by taking the working cord around the filler cord again to the right of the first wrap, passing the end though the loop formed under the filler cord. Pull the working cord to tighten the knot. Repeat steps 1–2 for each cord to the right in turn.
Step 3
To make another line underneath the first, bend the filler cord in front of the other cords on the panel horizontally from right-to-left. Repeat steps 1–2, but beginning with the right- hand cord and working each knot in reverse towards the left.
Instructions
Step 1
Tie the first row of 37 horizontal clove hitches (HCH) from right to left, using the extra-long cord as filler cord. Place the knots just underneath the stick or dowel.
Step 2
To make the second row, place the filler cord across the body of the work in the position you would like the clove hitches to be and tie another row of horizontal clove hitches from left to right. When you reach the 26th cord (12th from the right), slide the first bead onto it then make a horizontal clove hitch beneath it. Carry on to finish the second row.
Step 3
For the third, fifth and seventh rows, the bead is placed on the 12th cord from the left (not counting the filler cord).
On the fourth and sixth rows the bead is again placed on the 26th cord from the left (not counting the filler cord).
Step 4
For the last row, the bead is placed on the 19th cord from the left (not counting the filler cord).
Step 5
Cut the ends so they are the same length.
Follow Macrame author Fanny Zedenius on Instagram - @createaholic
Macrame by Fanny Zedenius is available now from good shops that sell books and online from Amazon and Waterstones.
Photography by Kim Lightbody