Recipes
Portuguese Custard Tart
Portuguese Custard Tart Recipe by Rebecca Seal
10 Dec 2019 | Rebecca Seal
Lisbon is a one of Europe’s most charming cities and well known for their incredible Portuguese tarts. In Lisbon, Rebecca Seal shares her favourite Portuguese custard tart recipe.
PASTEIS DE NATA CUSTARD TARTS (Portuguese Tarts)
Makes 24 tarts
Nothing says Portugal quite like a Portuguese custard tart: wobbly egg custard encased in layers of buttery pastry, which manages to be both crunchy and soft at the same time. Perhaps the most famous come from a shop in the Belem district of Lisbon, where they are said to have been invented by a former monk in 1837. Now, the Pasties de Belem shop sells thousands every day. While they are delicious, I prefer those sold at Manteigaria, a shop in the Chiado area – when a fresh batch is taken from the oven, they ring a bell so that hungry passers-by can rush in and grab a box while they are still warm.
Every pastry shop keeps their recipe a secret, so it’s impossible to know exactly what makes them so special. After a lot of (not exactly onerous) research and testing, I hope this recipe does the original pastel de nata justice. Avoid using a non-stick tart tin, as the high temperatures may break down the non-stick coating, which is not good for it or for you.
With many recipes, it is perfectly okay to play a bit fast and loose with the ingredients and method, but when it comes to patisserie, and particularly for these little beauties, it really pays to follow the instructions.
It is totally acceptable to use ready-made puff pastry if you prefer, but do opt for all-butter ready-rolled puff. You won’t get quite such authentic results, as pasteis de nata are made with a laminated dough, which is not exactly the same as puff pastry, but they will still be very good. Making laminated dough, as in the recipe below, is tricky and can require a bit of practice, but I encourage you to give it a go.
Avoid using a non-stick tart tin, as the high temperatures may break down the non-stick coating, which is not good for it or for you.
| INGREDIENTS
Pastry 275 g (10 oz/2¼ cups) plain (all-purpose) flour, plus more to dust ¼ teaspoon fine salt 125–175 ml (4–6 fl oz/½–¾ cup) cold water 200 g (7 oz) unsalted butter beaten until soft, but not melted Custard Filling 250 g (9 oz/1¼ cups) caster (superfine) sugar 150 ml (5 fl oz/²/³ cup) water 600 ml (1 pint/2½ cups) whole milk 1 vanilla pod, split lengthways ½ cinnamon stick pared rind of ½ unwaxed lemon, cut into long strips 12 egg yolks icing (confectioners’) sugar, to serve ground cinnamon, to serve 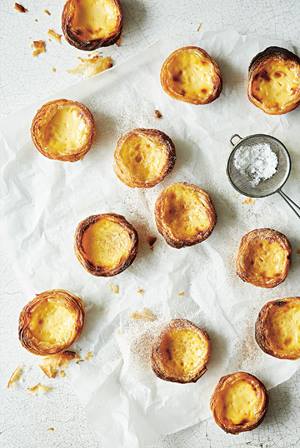
|
METHOD Using a spoon and then your hands, mix together the flour, salt and as much cold water as necessary in a bowl to make a soft, light dough. As soon as it starts to come together, turn it out of the bowl and onto a floured work surface. Press then roll it out to form a 15 cm (6 in) square. Wrap the pastry in cling film (plastic wrap) and chill in the fridge for 20 minutes.Roll out the chilled pastry to form a rough 45 cm (18 in) square, using lots of flour to prevent it sticking to the surface or the rolling pin. Trim to form a neat square. Divide the soft butter into three roughly equal quantities. If it is looking glossy or beginning to melt, pause here and chill it and the pastry for 10 minutes. Use a palette knife or spatula to spread one third of the butter over the left-hand two thirds of the pastry, leaving a 3 cm (1¼ in) gap all around the edge. Working quickly, fold the un-buttered right-hand third over the buttered middle third. (Use a pastry scraper or palette knife to loosen the dough, if necessary.) Working from the top down, pat the pastry to remove any air bubbles. Touch the pastry as little as possible, to stop it getting too warm. Next, fold the buttered left-hand third over too, so that it covers newly visible un-buttered pastry. You should have a long rectangle of pastry and no visible butter. Pat briefly to remove any bubbles. At this stage, the butter within the pastry layers can become a bit soft, especially on a hot day. If this happens, chill the dough for 10 minutes to allow the butter to firm up. Turn the pastry rectangle so one of the long sides is facing you. Gently roll it out to form a square again, being careful not to burst the layers of butter when you reach the edges of the pastry. Repeat the spreading-folding process with the second third of the butter, using lots of flour on the work surface and rolling pin again. Chill again if necessary. To use the final third of the butter, roll out the pastry into a rectangle roughly 45 × 55 cm (18 × 22 in), using lots of flour under the pastry and on the rolling pin. Working quickly, spread the remaining butter all over the pastry, leaving a 3 cm (1¼ in) gap around the edge. Spread it as thinly as you can, but be gentle, as the pastry will be fragile and prone to tearing. Starting with a shorter edge, roll the pastry into a tight Swiss roll or log shape, brushing off excess flour as you go. Trim the ends so that the edges are even, cut the log in half, wrap the two halves in cling film (plastic wrap) and chill in the fridge for at least 3 hours or overnight. (You can freeze all or half of the pastry at this stage. Defrost overnight in the fridge before using.) If using half the pastry, to make 12 tarts, remember to make half the quantity of custard. To make the custard, place the sugar and water in a saucepan and heat until the mixture reaches 105ºC (221ºF) on a pan thermometer. Remove from the heat and set aside. In a separate pan, heat the milk until just below boiling point, then add the vanilla pod, cinnamon stick and lemon rind. Remove from the heat and leave to infuse for 5 minutes or so. Whisk the egg yolks in a large heavy bowl until smooth and creamy. Remove the vanilla pod, cinnamon and lemon rind from the milk. Skim off any skin which has formed. Add a tablespoon of the hot milk to the egg yolks and whisk vigorously. Continue adding the hot milk, a tablespoon at a time, adding it slowly but whisking quickly, so that the eggs don’t cook and scramble. After adding 6–7 tablespoons of milk, slowly pour the remaining hot milk into the bowl, continually beating the mixture. Finally, add the sugar syrup in a steady stream, whisking continuously. Quickly wash the milk pan, then tip the custard mixture back into it. Set the pan over the lowest possible heat and cook the custard very, very gently, stirring continuously and running a spatula around the bottom and edges of the pan every now and then, to make sure all the liquid is moving all the time. After 8–25 minutes of gentle cooking, depending on your pan, the mixture should begin to thicken. If you have a pan thermometer, thickening will occur at about 75ºC (167ºF). Don’t let it get hotter than 80ºC (176ºF) as the custard may split. As soon as the custard has thickened to the consistency of double cream, remove it from the heat and pour into a clean, heatproof bowl. Cover the surface with cling film (plastic wrap) to prevent a skin forming, and set aside. An hour before you want to cook the tarts, preheat your oven to its maximum temperature, ideally 275°C (525°F/Gas 10). If you have a pizza stone, place it on the top shelf of the oven, or use a baking tray. Place a second pizza stone, or another baking tray, on the middle shelf of the oven. Let them both get really hot. This is the best way to replicate the fierce heat of bakery ovens, and will allow the tarts to cook quickly with crispy bases and (hopefully) to caramelise on top. Leave just enough space between the stones or trays for the tarts. Next, grease the holes of a shallow 12-hole tart tin (of the sort you’d make jam tarts in, rather than muffins). Remove one of the pastry logs from the fridge and leave it for about 10 minutes until it becomes pliable. Slice it into 12 discs and place each one, cut side down, into the tin. Have ready a cup of cold water. Dip your thumbs into the water and gently press the dough downwards and outwards, pushing it into the edges of the tin and upwards and outwards so that, ultimately, it fans out about 1 cm (½ in) above the edge of the tin. Try not to pinch these protruding edges though – if you can leave them a little thicker, they will frill out during cooking. The pastry will be about 2 mm (¹/8 in) thick at this point. Press the pastry edges slightly outwards, so that they don’t collapse inwards as they cook. They should be in the shape of an upturned hat with a brim. Pour the custard into each tart case, filling them generously and leaving about 7.5 mm (¼ in) of the pastry rim showing. Carefully slide the tray into the very hot oven. Bake the tarts for 10–16 minutes, possibly slightly longer if your oven can’t reach very high temperatures, checking them every few minutes after the first 10 minutes. The pastry edges may shrink down slightly and may appear to burn a little, but hold your nerve: slightly burnt bitterness is part of their characteristic flavour, and if you remove them from the oven too soon, the custard won’t caramelise on top. (I have to admit that caramelising the custard remains a bit of a dark art – sometimes it happens and sometimes it doesn’t. You can use a blowtorch if you really want, but your pasteis de nata will look more like crème brûlées.) When ready, the tart pastry will be brown and occasionally even slightly charred, with a few brown spots on top of the custard. Remove and leave the tarts to cool in the tin. (Don’t worry if a little butter seems to have escaped from the pastry – as they cool, this will resolve itself.) |

Available in bookstores and online
Click here to find your preferred online retailer