Extract
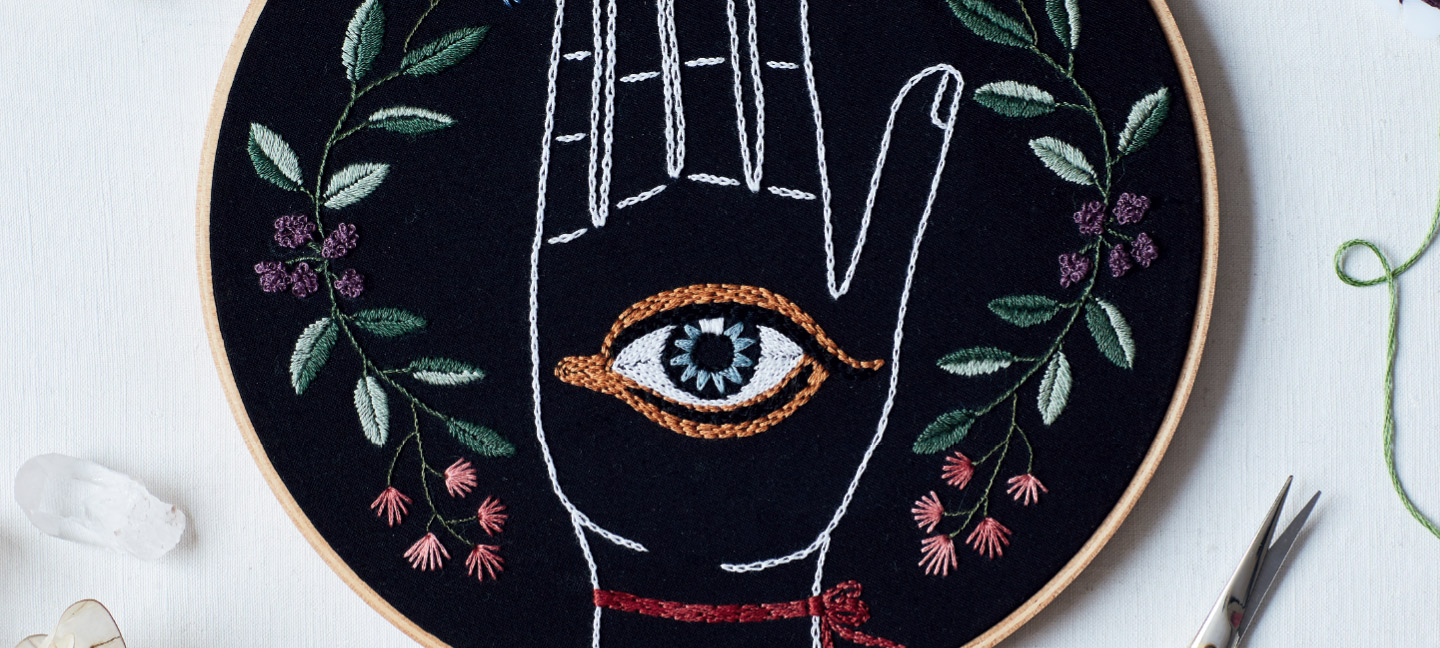
Embroidery Now by Jennifer Cardenas Riggs
Decorate and make your own embroidered notebooks
2 May 2020 | Jennifer Cardenas Riggs
Embroidery is a beautiful and calming form of art, and not at all difficult to start with a few materials. Embroidery Now by Jennifer Cardenas Riggs is a perfect handbook to getting you started on your embroidery crafting journey. The 'Fan Leaf Notebook Cover' below is not only an easy embroidery pattern, but also teaches you some of the principles of geometric pattern making so that you can adapt and adjust to make your own.
Fan Leaf Notebook Cover
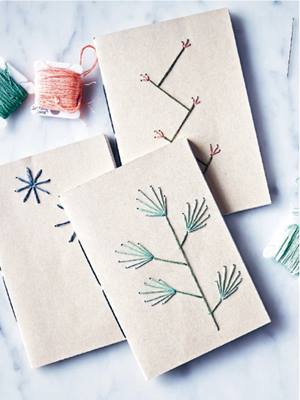 If you’re a fan of leaf motifs this project is for you. Straight stitches make up this jungle-themed notebook cover in shades of jade green.
| LEVEL: MEDIUM TIME: 2 HOURS STITCH TECHNIQUES: BACK STITCH (see below) |
MATERIALS 10 X 14.5 CM (4 X 5¾ IN) PLAIN KRAFT PAPER NOTEBOOK EMBROIDERY THREAD ( F LO S S )
EQUIPMENT
|
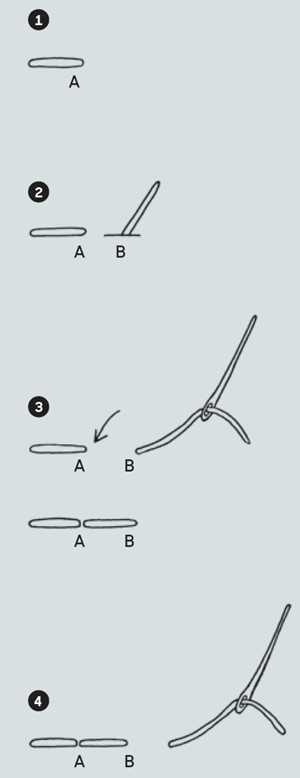 BACK STITCH
Back stitch is a go-to stitch and can work for any type of project. After running stitch it’s one of the easiest stitches to pick up, but after you have it mastered it looks anything but basic. The purpose of back stitch is to create a line that looks continuous without any breaks.
- Choose a point on the pattern where you would like to begin. Pull your needle through, starting from the back of the hoop, so that the knot is at the back of your fabric and your needle has been pulled through to the front. You can now begin the back stitch process.
- Create a small stitch backwards, so in the opposite direction to the way you want to work. The beginning of your small stitch will be point A.
- Your needle will now be at the back of your fabric again. Pull it through to the front again a stitch length ahead of your first stitch. This will be point B.
- Now take your needle through to the back again at point A. There should be no gap between the stitches – this will create a continuous line.
- Repeat this process until you either run out of thread or are done with the pattern. After pulling your thread through to the back of the hoop, make a small knot and cut off the excess thread.
When to use back stitch
Back stitch is the most versatile stitch technique and can be used to outline or fill in large areas of embroidery. It’s also a great stitch to use if you want to substitute a harder stitch technique with something more beginner-friendly – anytime you see chain stitch or stem stitch called for in the instructions, you can substitute back stitch.
FAN LEAF NOTEBOOK INSTRUCTIONS
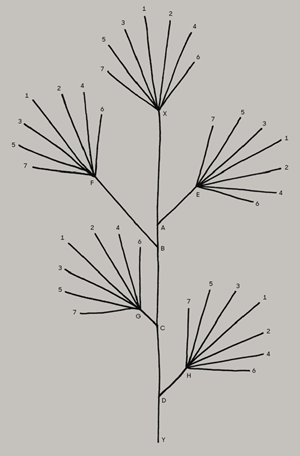
- On right side of the notebook (about one third in from the right-hand edge) measure out 9 cm (31/2 in) with the ruler. There should be a space at the bottom – the measurement should not start at the bottom edge of your notebook. Use the pen to make a dot at the top of the 9 cm (31/2 in) measurement – this is point X. Make a dot at the bottom of the 9 cm (31/2 in) measurement – this is point Y. (See below)
- With the ruler in the same place, make a small dot with the pen 2.5 cm (1 in) down from point X – this is point A. Make a second dot 4 cm (11/2 in) from point X – this is point B. Make a third dot 6.5 cm (21/2 in) from point X – this will be point C. Make a fourth dot 7.5 cm (3 in) from point X – this will be point D. (See pattern) below
- Place the ruler so that the edge is against point A. Angle the ruler up and to the right so it’s creating a 45-degree angle from the original line. Measure 1.2 cm (1/2 in) and make a small dot with the pen – this is point E.
- Place the ruler so that the edge is against point B. Angle the ruler up and to the left so it’s creating a 45-degree angle from the original line. Measure 2.5 cm (1 in) and make a small dot with the pen – this is point F.
- Place the ruler so that the edge is against point C. Angle the ruler up and to the left so it’s creating a 45-degree angle from the original line. Measure 2 cm (¾ in) and make a small dot with the pen – this is point G.
- Place the ruler so that the edge is against point D. Angle the ruler up and to the right so it’s creating a 45-degree angle from the original line. Measure 1.2 cm (1/2 in) and make a small dot with the pen – this is point H.
- Place the ruler so that the edge is against point X. Measure up, very slightly angling to the left, and make a small dot with your pen 2.5 cm (1 in) from point X. This is point one.
- Place the ruler so that the edge is against point X. Measure up and slightly to the right of the point one line. Make a small dot with your pen 2.2 cm (7∕8 in) from point X. This is point two.
- Place the ruler so that the edge is against point X. Measure up and slightly to the left of your point one line. Make a small dot with your pen 2.2 cm (7∕8 in) from point X. This is point three
- Place the ruler so that the edge is against point X. Measure up and slightly to the right of your point two line. Make a small dot with your pen 2 cm (¾ in) from point X. This is point four.
- Place the ruler so that the edge is against point X. Measure up and slightly to the left of your point three line. Make a small dot with your pen 2 cm (¾ in) from point X. This is point five.
- Place the ruler so that the edge is against point X. Measure up and slightly to the right of your point four line. Make a small dot with your pen 1.2 cm (1/2 in) from point X. This is point six.
- Place the ruler so that the edge is against point X. Measure up and slightly to the left of your point five line. Make a small dot with your pen 1.2 cm (1/2 in) from point X. This is point seven.
- Place the ruler against point E. Follow steps 7–13, replacing the instructions for point X with point E.
- Place the ruler against point F. Follow steps 7–13, replacing the instructions for point X with point F.
- Place the ruler against point G. Follow steps 7–13, replacing the instructions for point X with point G.
- Place the ruler against point H. Follow steps 7–13, replacing the instructions for point X with point H.
- Take your thumb tack and poke holes everywhere there is a small dot marking.
- Make a stitch between point X and point Y with three strands of #563 Light Jade, using back stitch.
- Make a stitch between point A and point E with three strands of #563 Light Jade, using back stitch.
- Make a stitch between point B and point F with three strands of #563 Light Jade, using back stitch.
- Make a stitch between point C and point G with three strands of #563 Light Jade, using back stitch.
- Make a stitch between point D and point H with three strands of #563 Light Jade, using back stitch.
- Make a stitch between point X and point one with three strands of #320 Medium Pistachio Green, using back stitch. Repeat, making stitches between point X and point two, point three, point four, point five, point six and point seven, all with three strands of #320 Medium Pistachio Green, using back stitches.
- Repeat step 24, making a stitch between point E and points one to seven with three strands of #320 Medium Pistachio Green, using back stitches.
- Repeat step 24, making a stitch between point F and points one to seven with three strands of #320 Medium Pistachio Green, using back stitches.
- Repeat step 24, making a stitch between point G and points one to seven with three strands of #320 Medium Pistachio Green, using back stitches.
- Repeat step 24, making a stitch between point H and points one to seven with three strands of #320 Medium Pistachio Green, using back stitches.
TIP: Use the knowledge gained in this project to come up with your own geometric patterns to create on the front of a plain notebook cover.
This is an edited extracted from Embroidery Now: Contemporary projects for you and your home by Jennifer Cardenas Riggs
Available now at bookstores and online
Click here to find your preferred online retailer